
You know how healthy food is supposed to be an array of beautiful, fresh colors?
Behold: Steel cut oats and chai tea with soy milk should be healthy right? So how come my breakfast is all the same color?
Hmmm...
Tuesday, March 10, 2009
Monochromatic Breakfast
Monday, March 9, 2009
Slow Cookin' Goodness
I confess, I love my crock pot.
Whether I'm fixing a roast and potatoes... or just turning simple ingredients into a simmering soup...
 I just can't go wrong.
What is your favorite thing to slow cook?
Wednesday, March 4, 2009
It's a Wrap?
Today for lunch I had the great idea that I was going to make myself a wrap. My co-worker, Vicki, is always bringing wraps to eat at work, and they always looks so tasty and healthy, that I thought I would give it a try. Here is my wrap before adding the lettuce: Components:
- toasted flour tortilla
- Miracle Whip, honey mustard, salt & pepper
- turkey
- tomato
- olives
 I could barely cram it into my bento box and get the lid on! I ate it like a big taco, because I never could get it to wrap up right. (I guess there was too much filling.)
Do you ever make wraps for lunch? If so, what is your secret? And what do you like to fill them with?
Happy Bento!
Friday, February 27, 2009
Pizza Bento (aka: Junk Food Friday)
Today was definitely a Friday "junk food" lunch. Behold:
 pizza bread
- thin mints

 This makes up for all the brown rice and grilled chicken I have on other days, right?
Happy Bento! (And happy Friday!!)
Thursday, February 26, 2009
Pun Sandwich
After my bento from yesterday, I was a bit puzzled as to what to pack for lunch today. So I settled on a sandwich:
Hurray for being "back in the box"!
Happy Bento!
Wednesday, February 25, 2009
Believe it or not: Bento!
Hi everyone!
I know it has been an age and a half since I posted any bentos, so here is one for you: Top tier:
- sliced turkey
- sliced roast beef
- carrot shapes
- brown rice w/ pineapple
- carrot stars
- celery slivers
- teriaki sauce
 All ready to go:
Happy Bento!
Tuesday, February 17, 2009
Shiny Sink
 It is easier to cook in a kitchen that is clean. In fact, the first thing I want to do when I see my kitchen sparkling, is mess it up again by baking tasty things.
Fortunately, my kitchen has been clean more often lately, thanks to FlyLady's encouragement. those of you who have not heard of FlyLady, you may want to check out her site. It is for those of us who need a little extra help being organized and tidy. She breaks everything into "baby steps" to make things manageable. There are daily missions (should you choose to accept them) that make cleaning almost fun.
If the website is too much to take in all at once (I must admit, you can kinda tell reformed-disorganized women are in charge of putting it together) then head to the library and pick up her book, Sink Reflections, instead.
Enjoy (your sink will thank you)!
Friday, February 13, 2009
Pecan Sticky Buns

Here is another recipe that I tried from Artisan Bread in Five Minutes a Day. Which really, if you haven't checked this out - you should. The recipes are straight-forward, and you can't beat the method for convenience. With the dough made up and waiting in your fridge, anytime is a great time to bake!
The sugar/butter topping goes on the bottom of the pan, and then the rolls get flipped over to serve.
It said to sprinkle the pecan halves in there, but I placed each one carefully, because that is how I was feeling at the time. Here is my rolled out dough, with the spicy/sugary/buttery mix on it.
 I did sprinkle the toasted pecan pieces. Incidentally, this is the first recipe I've ever made that called for toasted nuts. So I had to look up a YouTube video on how to do it.
 Then I rolled up the dough. I used the very last of my dough for this recipe, and wish I would have had a bit more. Oh well, no one ever complains that their sticky bun has too much sticky on top, right?
 And here is the final result:
 Enjoy!
Thursday, February 12, 2009
Lunch
 This is the most visually appealing lunch I've had in some time. Today one of my students asked if I ever decorate my lunches. Then she suggested that I should do that again. I will have to plan something here pretty soon and get back toward bentos.
Anyway, this salad came about because Bryan had asked me to cut up some lettuce ahead of time for the next night's dinner. But once I saw it all cut up and washed, it looked so much like a tasty salad that I took it for lunch, instead!
Oh well... I can cut up more.
Monday, February 9, 2009
Homemade Pizza
 I made homemade pizza tonight.
 I baked the pizza crust using the dough I mix up and keep in my fridge. I baked it first, before adding toppings, and that worked out really well.
 I also decided to try a new cheese tonight. What is special about the soy cheese pictured above is that it does not add the milk protein casein (which I'm allergic to) in order to make it melt like most alternative cheeses do. But it still melts! Watch:
 I was able to grate it easily onto my pizza.
 I put on the other toppings, turkey pepperoni and olives, and then transferred it directly onto my pre-heated pizza stone in the oven.
 When it was done it looked like this. And the best part is, it tasted good too! So I give two-thumbs up to this fake cheese. Now I just need to branch out on my other toppings...
Enjoy!
Saturday, January 31, 2009
The Calzone That Almost Was
Or... "How I Made a Great Big Bread Stick."
Wednesday of last week, I decided that homemade bread stuffed with pizza toppings would be delicious for dinner. Due to my allergy, I would not be putting any cheese inside, but still I had hopes of a calzone-like dinner creation.
I took out a lump of homemade bread dough I had in the fridge, and added pizza sauce and pepperoni slices to the middle. I shaped the loaf, and generously sprinkled pizza seasoning on top.
Later, taking it out of the oven, it smelled delicious. I found that some pepperoni had made its way to the surface out through the slashes I made in the top of the loaf, and had mostly burnt. The sauce seemed to have done the same thing.
 I sliced into the loaf, still warm -- only to find that there was no pocket of goodness inside at all. Under the unusual crust, the bread was completely normal. I poured myself a small bowl of pizza sauce to dip it in, and enjoyed it for the large breadstick that it was. I guess I should have used more stuff? And put it nearer the bottom of the loaf?
In any case, I have now made up some pizza dough, so next time I have this type of craving, I can just make myself a proper pizza.
Here's hoping your kitchen creations are more successful than this!
Friday, January 16, 2009
Lazy Day Bread Baking
Hello again!
I baked bread again from the batch of bread dough I mixed up about a week ago according to the directions in Artisan Bread In Five Minutes a Day. It is so easy, if you haven't tried it, you really should.


Underneath you may also notice that I have used a generous amount of cornmeal to keep it from sticking. It sits out for 20 minutes, then I preheat the oven to 450* and I set the timer for another 20 minutes - then I dust the top with a little flour and cut some little slits in the top. Then it goes into the oven.
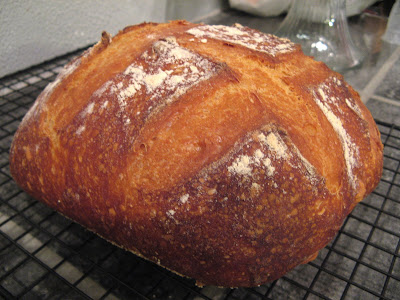
Happy Baking!
Tuesday, January 13, 2009
Starting off the New Year Right
Hello everyone in Bloggerland! At my friend Jaynie's urging, I am here to write a new post. (But it will have to be quick because I need to leave for work in a few minutes!)
Here is a picture of my favorite cookie I made over the holidays: It is a huge sugar cookie with left-over pecan rocha strussle on top. Yum! Bryan convinced me to make the cookie so large because I was despairing of ever being done rolling and baking all that dough. Note to self: next year, do a half-batch of sugar cookies!
 And here is my puppy dog, celebrating the new year:
 I hope you are all having a good start to your new year. I have been keeping my sink shiny, and reading a lot more (both in the Bible and other books). Ooh... and I have been playing my piano. So I have been keeping myself busy and doing things that I enjoy.
This past weekend I baked my first loaf of bread for the cold season (I can't believe I've waited this long!) and I have some more dough in the fridge, so I will be baking more soon. I will try to snap a few pictures and post them here.
Until then... happy baking!
Monday, December 22, 2008
Peanut Butter Balls
These delicious peanut butter candies are sure to be my downfall this Christmas season. I made enough to share, and now I am snowed in, and they are disappearing fast, if you know what I mean. If you would like to try them, you will have to make your own.

Ingredients:
- 2 cups sifted powdered sugar
- 1 cup creamy peanut butter
- 6 Tablespoons margarine
- semi-sweet chocolate chips
- parchment paper

Stir together the powdered sugar, peanut butter, and margarine until it is well mixed.


Shape the mixture into 1 inch balls (you may want to butter up your hands so they don't stick) and place them on a baking sheet lined with parchment paper.

Let balls stand for 20 minutes until dry, or better yet, put the whole tray in the freezer if there is room.
Melt the chocolate you will use for dipping. I tried a make-shift "double boiler" approach:

But it isn't necessary. If you are doing this with your kids, just pop a glass bowl of chocolate chips in the microwave, and call it good. That way they aren't standing over hot steam.

Dip the balls into the chocolate to coat. I used a metal skewer at first, and then gave that up and just dropped them in and fished them out with a spoon. Whatever works for you, go for it.
 Let the excess chocolate drip off, and place the chocolate covered ball back on the parchment paper.
Let stand until dry, and then store any extras tightly covered in a cool dry place.
 Thanks to Debi for another easy Christmas candy recipe!
 Thanks to Debi for another easy Christmas candy recipe!
Enjoy!
Thursday, December 18, 2008
Snow Day!
Looks like I will get a chance to do some more Christmas baking, because I got a snow day today. Yipee! Here is a picture of Dioji helping me celebrate: Stay tuned for more Christmas sweets...
Wednesday, December 17, 2008
Homemade Pecan Rocha
The Christmas season is re-kindling my love for food and baking. Thank you to those who have encouraged me to return to blogging. This post is for you.
Here is a close-up of the delicious pecan rocha that Debi taught me how to make yesterday:

Doesn't it look divine? To me, it tasted just heavenly. Of course, I hadn't had anything carmel for some years (due to the fact that store-bought carmel has milk in it, and it never occurred to me that carmel was a thing that could be made at home, milk-free) but my other co-workers seem to agree that it was very tasty.
 It was really easy to make...
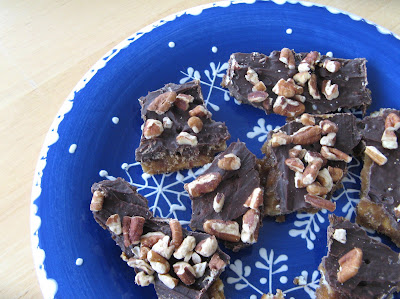 Then the only question that remains is, will you share?
 It was really easy to make...
Ingredients:
- about 1 sleeve of saltine crackers
- 1 cup margarine (or butter)
- 2 cups brown sugar
- 12 oz bag of mini chocolate chips (or more, to taste?)
- finely chopped nuts (almonds if you're traditional, or whatever you like)
- sheet of parchment paper to cover your baking tray
Cover the bottom of your baking tray or 9x13 inch pan with parchment paper, and then lay the crackers out on top - being very careful not to overlap the crackers.
Melt the margarine in a small pot on the stovetop, and add the brown sugar. Boil for 3 minutes, being careful not to let it burn. Pour this carmel-y syrup over the crackers.
Sprinkle chocolate chips on top. Place in a preheated 350* oven and bake for 5 minutes. Spread the melted chocolate chips with a spatula to form a chocolate-y crust. Sprinkle the nuts on top, and press them into the chocolate a bit so that they will stay.
Allow the candy to cool, and then break up or cut with a knife.
 Then the only question that remains is, will you share?
Happy baking!
Subscribe to:
Posts (Atom)


