Showing posts with label bread baking. Show all posts

Monday, January 15, 2024

Sourdough English Muffin Reprise

Today I went back and made a recipe I think I only made one other time before: Sourdough English Muffins.  

I printed out a hard copy of the original recipe I had gotten from another person's food blog.  And I pulled up my own last blog entry about this particular recipe.  I got out my starter and mixed up the dough. I placed a post-it note on there so I knew when it would be ready for the next step.


And then I stayed up way to late playing with this blog, and all the food pictures I had taken, and subsequently slept in.  So 15 hours later (instead of the 7 to 10 hours recommended by the recipe) I assembled my ingredients.  Sugar, whole wheat flour, AP flour, baking soda, salt, and cornmeal.  For the recipe and step by step instructions, please see my previous post.


Telling myself that my house is chilly (since it was a modest 18 degrees outside this morning) and that the extra time was probably warranted for the sourdough to bulk up, I began to mix the other dry ingredients in. The dough deflated substantially as I added these things in.


I think I probably had the right idea last time, using the whole wheat flour in the initial dough, but either way works.


The dough came together and was no longer sticky.


I did the final mixing by hand, and then prepared my workspace with flour, and the baking tray generously sprinkled with cornmeal (could have probably used less, but it didn't harm anything).


After I used a cup to make these the last time, I was given biscuit cutters.  I am sure that I have used them at some point, but was thrilled to get them out again today to revisit this recipe. I dipped it in the flour so it wouldn't stick to the dough.


I used my new bench scraper to measure the dough when rolling it out.  I had made it a bit thin, so I actually scrunched it back together so it was the desired height. How handy to have a way to measure it so easily!


I got ready to cut out the first biscuit, and then suddenly decided I didn't want to cut directly on my tabletop.


So I grabbed this mat instead and cut on that.


It didn't seem like there would be room for very many biscuits with the dough at the prescribed thickness, and the recommended size cutter. 


I had my son come and cut one out, just for fun.


I placed them on the baking sheet, and continued cutting.  I balled the left over dough up and cut again.


I ended up with nine circles of dough on the tray when I was through.


I sprinkled cornmeal on top of each one.


I covered them up and let them rest for about an hour.  (The recipe says 45 minutes, but as I mentioned, it is chilly here today, so I gave them some extra time.)


Here's what they looked like after their rest.

Next, they went into the non-stick skillet, careful not to touch.

The first batch I did based on time.  There were no little bubbles on top to show me when they were done, as the dough had seemed to dry like a skin on the top while resting.  Based on the time, they ended up a little darker brown than I liked.

So I went easier on the next round, turning the heat down just a bit (medium on my gas stove top seems to be a bit hotter than medium on my electric range was) and cooking them a little less time on each side.

It was fun to cook along with "past me" by having my blog up to look at.

However, this time there was no rejoicing in those "big beautiful holes" because the crumb was not that open.  I am not sure if my baking soda is old and had an effect on the rise, or if it is the temperature of my kitchen.

However, they look and taste like english muffins, were not as labor-intensive as I had remembered, and were tasty with homemade jam, as well as in a McMuffin-style with meat and egg.

Enjoy!

Sunday, October 3, 2010

No Knead Rolls

It has been coming on for a while now. The cloudy days and cooler nights have me thinking of baking. Today, I couldn't help myself. We just had to have homemade rolls with dinner.

So I looked up a no knead recipe. One of the top no knead roll recipes was from Oprah. Since it didn't have any milk in it, I gave it a try.

These first couple pictures are of my dough as it is rising. I used a plastic ice cream container left-over from our last milkshake party, and poked a couple holes in the top to allow it to breath while the yeasties were doing their rising thing.


Here are the rolls after I punched them down and formed them:

I had warmed the oven slightly (by baking brownies and then opening the door up to let it cool some) so that they would rise well.

Here they are after they have been buttered and are browning.

They turned out nice and brown on top.

My husband asked if this was a new recipe, because they were not as dense as the dinner rolls I typically make. Then he got himself a second light and fluffy roll to slather good jam on. I call that success.

What are you baking?

Saturday, January 31, 2009

The Calzone That Almost Was

Or... "How I Made a Great Big Bread Stick."

Wednesday of last week, I decided that homemade bread stuffed with pizza toppings would be delicious for dinner. Due to my allergy, I would not be putting any cheese inside, but still I had hopes of a calzone-like dinner creation.

I took out a lump of homemade bread dough I had in the fridge, and added pizza sauce and pepperoni slices to the middle. I shaped the loaf, and generously sprinkled pizza seasoning on top.

Later, taking it out of the oven, it smelled delicious.

I found that some pepperoni had made its way to the surface out through the slashes I made in the top of the loaf, and had mostly burnt. The sauce seemed to have done the same thing.

I sliced into the loaf, still warm -- only to find that there was no pocket of goodness inside at all. Under the unusual crust, the bread was completely normal. I poured myself a small bowl of pizza sauce to dip it in, and enjoyed it for the large breadstick that it was. I guess I should have used more stuff? And put it nearer the bottom of the loaf?

In any case, I have now made up some pizza dough, so next time I have this type of craving, I can just make myself a proper pizza.

Here's hoping your kitchen creations are more successful than this!

Friday, January 16, 2009

Lazy Day Bread Baking

Hello again!

I baked bread again from the batch of bread dough I mixed up about a week ago according to the directions in Artisan Bread In Five Minutes a Day. It is so easy, if you haven't tried it, you really should.

Here is a picture of the food grade plastic bucket I keep the dough in. It just sits in the fridge, doin' its thing, until I'm ready to bake.

You can see that I just tore about half of it off, and the rest is going back into the fridge for another day.

Here is a close-up of the dough resting. You can see it is on a cookie sheet -- not a baking tray with an edge on it, because I will be sliding it directly into the oven from here (I do not have a pizza peel which is used for this by people who are really serious about bread baking).

Underneath you may also notice that I have used a generous amount of cornmeal to keep it from sticking. It sits out for 20 minutes, then I preheat the oven to 450* and I set the timer for another 20 minutes - then I dust the top with a little flour and cut some little slits in the top. Then it goes into the oven.

Here is a really crummy picture of the bread while it is baking. The purpose of this ugly photo is to show that the bread is baking directly on a pizza stone which was preheated, and that below is a broiler pan with water in it, to create steam inside the oven. This really helps the bread have the moisture on the crust it needs during that last little rise, called "oven spring." (Don't worry, your crust will still be crisp when you are done baking.)

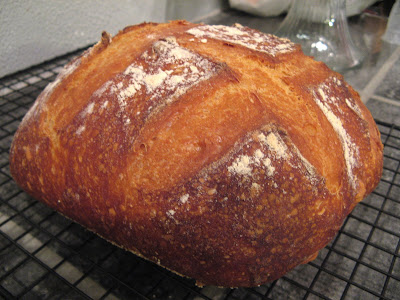
Here is the final loaf after 50 minutes in the oven. While I took this picture, the crust was crackling beautifully (like the sound of Rice Crispies with milk on them - but so much more satisfying when it comes from a loaf of fresh baked bread).

Happy Baking!

Friday, February 29, 2008

French Bread - When Daring Bakers and Julia Child Collide

Here it is, folks... my 100th blog post!


This month the Daring Bakers made Julia Child's French Bread. This challenge was co-hosted by Breadchick Mary of The Sour Dough and Sara of I Like To Cook. Thanks to both of you for such a great challenge! Because really, who doesn't like fresh baked bread?

Those of you who read my blog regularly know that I often dabble with bread baking. If I'm not whipping up a sourdough starter and baking sourdough bread... then I'm taking the easy way out and serving up no knead bread.


But this recipe was a little different from what I have been doing lately. Since my birthday, earlier in February, I have been happily baking away out of Artisan Bread in Five Minutes a Day. Imagine, if you will, my shock in finding that this month's challenge recipe was supposed to take me 7 to 9 hours to complete. Um... I pretty sure there is a baguette in here somewhere... (pages of my new favorite bread book flipping). Just kidding!

Staying true to a common recipe is what gives Daring Bakers common ground, and the chance to share our experiences with one another. So, I decided this would be a great time to test the flavor and crumb of this bread against the quick method I have been using.

Need a quick taste of what's in store? Here is a sneak-peak of where we're headed with this:

So let's get started, shall we? For the record - this recipe is not hard. It just takes some time. Bread baking is sort of like laundry that way. Not a very glamorous comparison perhaps, but you would never choose not to wash your clothes simply because the whole process is going to take n hours. Because the machine does most of the work, you just have to be around once in a while to keep things on track. And, clean clothes are worth it. Same with bread.

First we mix up the dough. The ingredients (represented above) are very simple. Dissolve 1 3/4 teaspoons of instant yeast into 1/3 cup warm water. (The warm water tells your yeast, "Wake-y, wake-y... time to bake-y!" if you use hot water it will say, "Die, rebel scum!" or something like that.) Let it stand while you measure out 6 1/2 cups of unbleached all purpose flour into a mixing bowl. Add the yeasty water, 2 1/4 teaspoons of salt, and 1 1/4 cups of room-temp water to the flour and stir it together with your trusty wooden spoon (or plastic spatula... whatever floats your boat).

Now the recipe reads, "Wash and fill the mixing bowl with 10 1/2 cups of tepid water (70 – 80 degrees) and make a mark to indicate that level on the outside of the bowl. Note, that the bowl should have fairly upright sides; if they are too outward slanting, the dough will have difficulty in rising. Pour out the water, dry the bowl, and place the dough in it." So I chose a plastic, food grade bucket to let my dough rise in. I filled it with water and marked it like suggested.

Only to realize that my favorite method of providing a warm place for my dough to rise was no longer going to work. I couldn't very well shove my plastic bucket into a warm oven, now, could I? So I used a suggestion from our hosts and placed the bucket on a towel-covered hot pad. Doesn't my dough look cuddly?

You may have noticed that the lid looks like it is on pretty well in that picture above. It is. More about that later...

It took FOREVER for my poor dough to rise. When it finally reached it's mark...

I took the now-bulging lid off and *Poof!*

...huge bubbles deflated, and a bunch of those gases rushed out.

Since it had been rising for so long, when I put the dough on the table to knead it - it had baked a little on the bottom. Oops!

Well, there was kneading, a second rise (without the lid - thank you very much) and the forming of loaves. This is what they looked like just starting the final rise:

And aren't they beautiful?

How 'bout from another angle? Boy, I couldn't wait to get those into my oven.

But this may bring a tear to your eye. Look how sadly they deflated when I transfered and then slashed them. Poor things.

Oh well. I got them onto my pizza stone, threw some ice cubes into the broiler tray below, checked my new oven thermometer and got them baked. And they were very tasty.

One thing I was very pleased with, were the little blisters in the crust:

Here are two of the loaves, one split open to see the crumb.

Feeling like you would like to be munching on some of this delightful bread yourself? Take a look at the recipe (or download the recipe in pdf form for easy printing) so you can have fresh bread coming out of your own oven. Or, if you just want to ogle everyone else's, visit all the lovely Daring Bakers who participated in this month's challenge - and check out these DBers too.
So... what was our verdict on this versus the quick method I've been using? They do not produce identical loaves... but the convenience more than makes up for it. I prefer the quick method. But I am glad to have done it Julia Child's way, and thoroughly enjoyed this challenge.