Showing posts with label english muffins. Show all posts

Monday, January 15, 2024

Sourdough English Muffin Reprise

Today I went back and made a recipe I think I only made one other time before: Sourdough English Muffins.  

I printed out a hard copy of the original recipe I had gotten from another person's food blog.  And I pulled up my own last blog entry about this particular recipe.  I got out my starter and mixed up the dough. I placed a post-it note on there so I knew when it would be ready for the next step.


And then I stayed up way to late playing with this blog, and all the food pictures I had taken, and subsequently slept in.  So 15 hours later (instead of the 7 to 10 hours recommended by the recipe) I assembled my ingredients.  Sugar, whole wheat flour, AP flour, baking soda, salt, and cornmeal.  For the recipe and step by step instructions, please see my previous post.


Telling myself that my house is chilly (since it was a modest 18 degrees outside this morning) and that the extra time was probably warranted for the sourdough to bulk up, I began to mix the other dry ingredients in. The dough deflated substantially as I added these things in.


I think I probably had the right idea last time, using the whole wheat flour in the initial dough, but either way works.


The dough came together and was no longer sticky.


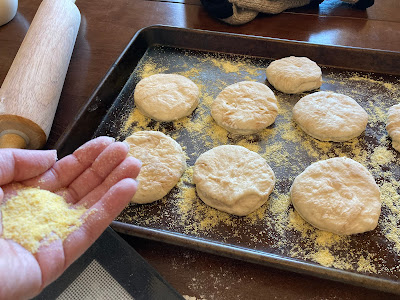
I did the final mixing by hand, and then prepared my workspace with flour, and the baking tray generously sprinkled with cornmeal (could have probably used less, but it didn't harm anything).


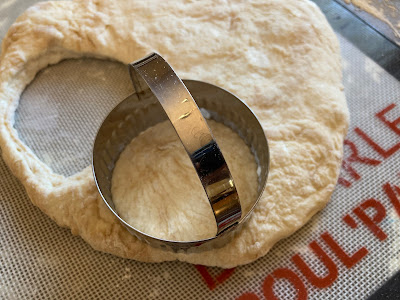
After I used a cup to make these the last time, I was given biscuit cutters.  I am sure that I have used them at some point, but was thrilled to get them out again today to revisit this recipe. I dipped it in the flour so it wouldn't stick to the dough.


I used my new bench scraper to measure the dough when rolling it out.  I had made it a bit thin, so I actually scrunched it back together so it was the desired height. How handy to have a way to measure it so easily!


I got ready to cut out the first biscuit, and then suddenly decided I didn't want to cut directly on my tabletop.


So I grabbed this mat instead and cut on that.


It didn't seem like there would be room for very many biscuits with the dough at the prescribed thickness, and the recommended size cutter. 


I had my son come and cut one out, just for fun.


I placed them on the baking sheet, and continued cutting.  I balled the left over dough up and cut again.


I ended up with nine circles of dough on the tray when I was through.


I sprinkled cornmeal on top of each one.


I covered them up and let them rest for about an hour.  (The recipe says 45 minutes, but as I mentioned, it is chilly here today, so I gave them some extra time.)


Here's what they looked like after their rest.

Next, they went into the non-stick skillet, careful not to touch.

The first batch I did based on time.  There were no little bubbles on top to show me when they were done, as the dough had seemed to dry like a skin on the top while resting.  Based on the time, they ended up a little darker brown than I liked.

So I went easier on the next round, turning the heat down just a bit (medium on my gas stove top seems to be a bit hotter than medium on my electric range was) and cooking them a little less time on each side.

It was fun to cook along with "past me" by having my blog up to look at.

However, this time there was no rejoicing in those "big beautiful holes" because the crumb was not that open.  I am not sure if my baking soda is old and had an effect on the rise, or if it is the temperature of my kitchen.

However, they look and taste like english muffins, were not as labor-intensive as I had remembered, and were tasty with homemade jam, as well as in a McMuffin-style with meat and egg.

Enjoy!

Sunday, December 30, 2007

Sourdough English Muffins


Are you ready to bake delicious english muffins at home? I found a great recipe for doing just that at Recipes For the Future. Join me in making these tasty breakfast treats from scratch with your sourdough starter.


The first step is to make sure that you starter is fed.  (This means adding flour and water and bringing it to room temperature.)  Then mix up the dough as follows:
  • 1/2 cup sourdough starter
  • 1 and 3/4 cups all purpose flour
  • 1/4 cup whole wheat flour
  • 1 cup water (if your water doesn't taste good to drink out of the tap, consider using bottled water)
Stir it up well, cover with cling wrap and let it sit on the counter overnight (about 7 to 10 hours).  In the morning, add
  • 1/4 teaspoon baking soda
  • 1 teaspoon sea salt (or 1/2 tsp table salt)
  • 2 Tablespoons white sugar
  • Up to 3/4 cup additional AP flour (add gradually as shown below)


Add the flour a couple tablespoons at a time, just until the dough has lost its stickiness.  We still want it to be nice and moist.

After stirring the flour in, you are ready to roll!

Roll the dough out on a lightly floured surface.  You are aiming for a thickness of about 1/2 to 3/4 of an inch thick.

If you don't have a biscuit cutter, don't worry about it.  Just choose a glass from your cupboard and go with it.  I opted for "cute" size this time, but next time will use a glass with a bigger rim (ideally 3 inches in diameter) so they are the right size for the toaster.  Live and learn, eh?  Oh yeah - and dip the rim of the glass in flour before cutting out the circles, so it won't stick.

(My dad asked why I couldn't use a cookie cutter for this step.  And you could.  But don't blame me if your family laughs when you serve breakfast bread in the shape of a gingerbread man or Valentine's heart.)

Keep cutting.  This step is fun, I think.  I've never made biscuits before - so I was really eating this up.  I even made Bryan get up from the computer and come see how much fun I was having.  When you can't cut out anymore, gob the dough together again, roll it out and repeat until there is no more dough left.

In the background you can see that I am placing the cut-outs on cookie trays.  What you can't see is that they have been generously covered in cornmeal.  This is an important step - not only to make sure they don't stick, but so that your muffins turn out looking like the ones you get at the store.  As my husband would say, the cornmeal "is a feature".

Sprinkle the cornmeal on the tops of the little guys, too.  Don't be shy here!  Keep on shaking till you're satisfied.  Then cover them up with a clean, non-terry cloth towel.  You are going to let them nap for about 45 minutes.

Here is a disappointing close-up of the dough after its little nap.  I couldn't really see if anything was happening.  You might not be able to either.  Resist the urge to send me hate-mail.  Continue on to the next step.

Heat up your non-stick skillet (or slap a smidge of butter in there if you are using the sticky kind) and start putting your little rounds in there.  But be careful!  Treat these like they are pancakes at this point.  If they touch (like a few of mine did) they are going to stick and it will be hard to dislodge them from one another.  (See the two in the middle of the pan?  Nuff said.)

Also, when I say you treat 'em like pancakes, that is also how you will know when to flip them.  Cause you're only flippin' these little boogers once.  While cooking the first side, wait till you can see bubbles on the top and then you know it's time to flip them over.  Then the time it takes to cook the second side will be slightly less than what it took for the first side.  Ballpark figure?  Probably  4 or 5 minutes for the first side on medium heat, and then maybe 3 minutes on the second side.  But really, wait for bubbles on the first side and then check the bottom side for when it is nice and brown.

Now transfer these to a cooling rack and let them cool (or the inside will be doughy).  Give them about 10 minutes, maybe.  Cut them open with a serrated knife and rejoice in those big beautiful holes. 

While they are still warm, spread a bit of butter on them - or slather them up with homemade jam.  (Thanks again, Leslie for the strawberry jam!)


Enjoy!