Wednesday, November 23, 2011

Chocolate Peanut Butter Acorns

So, a little over a month ago my aunt Jackie posted a link to her Facebook page.  I've been wanting to do these little guys ever since:


Today, I finally got my chance.  I assembled the three ingredients:


And got to work unwrapping those Kisses.


Now, I should point out, that this is not a milk-free recipe.  But it was so cute, I had to do it anyway.


As a side-note, you may want to hide the ingredients until the day of the craft, if you have husbands (or kids) that will snack on your blogging materials.  (This is the second bag of Hershey Kisses I've bought for this purpose.)


Slowly my plate filled with unwrapped chocolates.  (Not as slowly as if I could have been snacking on them though.)


Next I poured a small amount of mini chocolate chips into a microwave safe bowl.   The Six in the Suburbs blog where I first saw this recipe says half the bag, but that seems excessive.


You microwave them for 10 seconds or so at a time, stirring well in between.  When they start to get melty like this:


Stop heating them, and just keep stirring till they look like this:


Now dip the flat end of one of your unwrapped Kisses into the warm chocolate, and attach it to a Nutter Butter Bite (or a half of one, depending what look you want).


Repeat:


Now you are ready for the finishing step.


Dip the flat end of one of the un-melted mini chocolate chips into the melted chocolate (you may have to reheat it, depending how long the last step took.)


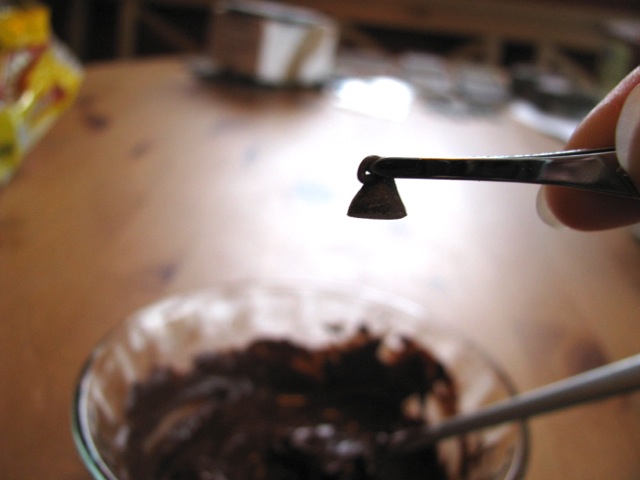
And place it on top to finish your acorn.


Keep going until they all have toppers.


You are done!  Congratulations on your very cute acorns.


Enjoy!

Tuesday, November 1, 2011

Crispy Homemade French Fries

So, I wanted to make up some homemade french fries for my friends the other day.  I went to my trusty blog (which mostly functions as a handy recipe book, these days) and searched "fries."  Unfortunately for me, it turns out I never did that post I meant to about how to make the perfect, crispy, delicious batch of homemade fries like I thought I had.  So here it is now, for all of you (and me, next time I want it -lol).

First take the potato of your choosing.  Yes, the humble spud.  My husband is partial to Yukon Golds, so that is what I will be using in this post.


Cut up your potatoes into thin strips.  (Leave the peels on.)  Put them in cold water, and rinse them until the water runs clear. 


Pat them dry with a paper towel.


Heat your oil to 350 degrees, and lower a small amount of potato slices in.  Make sure they are fully covered.  Stir them, if using the stove.  If using a basket and a deep fryer, give the basket a shake occasionally so they don't stick together.  Fry them for five minutes.


Bring them up and try to dismiss the visions of McMinamin's greasy, floppy fries from your mind.  We aren't done here.


Let the oil drain a bit, and then put them on a baking tray and put them in an oven heated to 200 degrees to keep them warm, while you fry up other small batches of fries.  


If you are only making 20 or so fries, you can skip this step.  But don't overfill your fry basket in order to not have to heat the oven.  You want your fries to have hot oil on all sides, not other potato pieces slapped up against them! 


Continue frying small patches of up and adding them to the tray.  Then heat your oil up some more.  Preferably 425 degrees, or if your fryer only goes to 375 degrees like mine, just crank it all the way up. Dip them in there for two more minutes.


Dab them off again with paper towels.  Add salt.


Maybe not quite this much salt:


But look how crunchy and divine these look!


A little ketchup, and you are good to go.


If you are the skeptical or scientific type, take a look at The Burger Lab's post about why we double fry them.  Also, the recipe is from the same guys, and can be found here.

Enjoy!

Wednesday, August 31, 2011

Peanut Butter Frosting

I've decided that my attention to domestic activities appears to be in direct relation to the amount of time I spend alone in my home.  When my husband is home, it rarely occurs to me to try a new recipe or scrub down all the walls.  But when he isn't here... I begin to fill my time in Suzy Homemaker ways.

Today while he was at work, for example, I decided to try making some cupcakes and decorating them with a swirl of peanut butter frosting.  That was a first - I've never made peanut butter frosting before today.  I will be taking these cupcakes to bunco tonight and will see what my tasting panel thinks.  But I am getting way ahead of myself.

First, I mixed up some batter and dolloped it into the tin:


All ready to go in the oven:


When the cupcakes were baked and cooling on the counter, I began making the frosting, roughly by this recipe here.  But I subbed margarine in for butter - then cut it back because no one wants a mouthful of margarine.  I upped the peanut butter to compensate.  I used soy instead of cream.  I also added some vanilla for good measure.  It wasn't looking too promising there for awhile:


But I got it whipped into shape before too long.  Then, using a Pampered Chef kitchen gadget that always reminds me of puffed paint, I started frosting my cupcakes.


Like so:

They turned out like this:


Viola!


I wished I had chocolate sprinkles to top them with, but I don't.  Maybe I will run to the store and get some... along with a container to transport them to bunco tonight.

Happy baking!

Wednesday, August 3, 2011

Ice Cream Sculpture

Our favorite dessert place to go to is Ice Cream Renaissance. So when my husband signed his contract for his new job, we decided to go there and celebrate. We ordered an "Indecision" for him and they brought him this fantastic two-toned ice cream sculpture in the shape of a bear with "congrats" written in chocolate syrup.

We snapped a picture before digging in. They also have a nice variety of milk-free sorbets (including Chocolate Decadence which is to die for!) for me to choose from. If you are anywhere in the area, you should check them out. All their ice cream is made on site, and it is delicious!

Saturday, July 23, 2011

Dining like a Princess

By far the most fun I've had with my food this summer was all the delightful offerings on the Alaskan cruise we just went on. We did formal dining for the majority of our meals because it is easier for me with my food allergy. But who doesn't love a five course breakfast, right?

Here we are in the International Dining Room before dinner one evening.

Here is Bryan humoring me by posing with one of his favorite desserts - the Love Boat Dream.

They made me pretty non-dairy desserts too.

They also had a fruit carving demonstration, which was entertaining:

And a cooking show, with more beautiful food carvings:

Our waitor, Ramil, was in the cooking show. That's him on the left.

We enjoyed our dining experience and waitstaff so much, we got a group picture with them at the conclusion of our cruise.

For all my fellow foodies out there... save your money and go on a cruise. The food alone is well worth it!

Tuesday, July 5, 2011

Bacon-y Reprise

This year for fourth of July the Bacon Explosions were back by popular demand. They were so popular last year, in fact, that we made four this year! If you haven't tried this yet, I highly reccommend it. See here for step by step instructions.


Yum!

Sunday, June 19, 2011

Summertime is Coming!

I am so excited that grilling season is here again! My husband is amazing at the grill. Here is a quick snapshot of dinner:

I made red roasted potatoes in the oven while he was working the above magic.

Happy grilling!