Showing posts with label easy meal. Show all posts

Monday, January 15, 2024

BBQ Pulled Pork

One of my favorite meals is BBQ pulled pork sandwiches. I used to get them all the time when we would go to a restaurant.  Then I learned to make them at home using a dead simple recipe I found on AllRecipes.com. In 2009 I served this for Christmas and my brother Tony raved about it and kept going back for extra helpings. We have enjoyed this meal time and again since then, and today I am going to walk you through how we make it, step by easy step.


First I gather up my ingredients.  You need:
  • pork
  • BBQ sauce
  • beef broth
The original recipe calls for boneless pork ribs.  I always just use a roast. Use a bottle of your favorite BBQ sauce, and about 2 cups of beef broth.


Next, plug in your slow cooker.  You think I am joking. I can not tell you the number of times I have come back to the kitchen to find that the rice in the steamer or the food in the crockpot is not cooking because I forgot this step.


Put the pork in the slowcooker.


If you are mixing up beef broth from bullion or Better Than Bullion, do that now.  2 teaspoons of Better Than Bullion, whisked into boiling hot water.


Pour the beef broth into the slowcooker with the pork. If you are using beef broth in a can or carton, there is no need to mix it, and you would just pour it in.


Put on the lid and set the temp.  Either cook this on high for at least four hours, or on low for eight if you have time.  The slower and longer it cooks, the easier it will fall apart in the next step.  When it is done cooking, heat up your oven to 350 degrees Fahrenheit.


Use two forks and pull the pork apart into chunks and shreds.


Keep doing this until the whole roast has been pulled apart.


Pour the BBQ sauce all over the meat. Don't skimp!  You are going to use the whole bottle.


Continue covering the meat with the sauce.


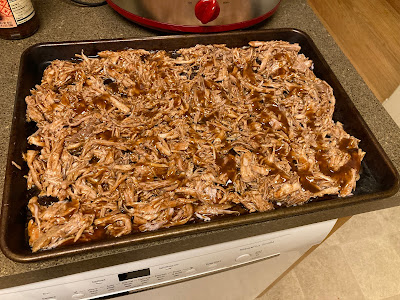
Stir all the pork around to cover it with the sauce somewhat evenly.  Then spread it back out on the baking tray, and top it with any remaining BBQ sauce in the bottle.


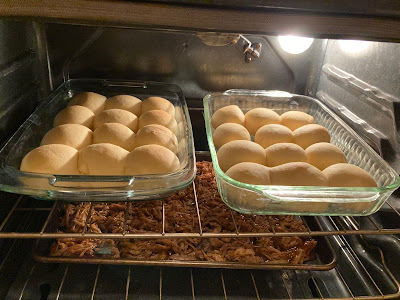
Place the sauced meat into the oven and cook it for about half an hour.


Remove from the oven and serve hot.


If you want to bake up homemade Hawaiian rolls to put the pork on, check out this recipe for that.


Enjoy!

Saturday, November 24, 2012

Weeknight Roast Chicken

This was a revelation to me.  I had never roasted a chicken before.  I started this post back in September when I actually cooked this particular bird, but I have done it since then too.  It is so easy!  I got my recipe off of The Pioneer Woman Cooks blog.  (Sometimes I think I would like to be Ree Drummond when I grow up - she cooks the most amazing things, takes beautiful photographs, and has a witty way with words.  I've said it before and I'll say it again, if you haven't checked out her blog, you should.)


Let's start with some butter (or in my case, margarine, due to a milk allergy).  But butter just sounds better, doesn't it?  Scoop the butter into a bowl, and zest a lemon over it.


I used half margarine and half coconut oil.


Then we put some fresh rosemary over the top.  Chop it up and throw it in.


Next comes kosher salt and pepper.  Someday I am going to get a pepper grinder and have "fresh ground pepper" like all these recipes call for.  But I haven't gotten around to it yet.


There it is.  A colorful combo of fat and seasonings.


Stir it all up.


See, this is kinda like painting by numbers.  You just look at the photo and do what you see.   This is my kind of cooking!  You've got a bird, I've got a bird, so does Ree.  It is like a group cooking therapy session.  Or something.


Scoop the goop onto the bird.


Smear the butter mixture all over the bird, and squeeze one of the lemons over it.


Then stuff the other lemons and a sprig of rosemary into the chicken's cavity.  


Make sure and use it all up!


Then put it in the oven at 425 degrees for a regular oven (400 for convection) and roast the bird for about an hour and 15 minutes or an hour and a half.  This is what surprised me the most!  I was able to make this meal on a work night, because the cook time isn't crazy-long.


Here is what it looked like when it was done.


Delicious!


Cover it up with foil for about ten minutes to let all those juices set inside there before you carve it.


It doesn't look like much wrapped up tight, but it smells like heaven!


As an aside, I use only the freshest ingredients when making my sides.  I would never reach into my pantry and find, for example, a spud that has been in there so long it has grown another potato.


Then I looked up how to carve the thing.  I turned to Video Jug for this info.  Seemed to work just fine.


And there is dinner!


Enjoy!

Friday, February 15, 2008

Pineapple Pork Chops


One of the first dinner recipes I learned to cook was pineapple pork chops and rice. I found the original recipe at Cooks.com. If you'll excuse the florescent lighting in my kitchen, I will show you how easy these are to make.

The original recipe calls for butter, but at some point I substituted olive oil, and have been sticking with that ever since. I just pour a little bit in the bottom of the pan, like you would to saute up veggies or something.


Next, have your husband trim any excess fat from the pork chops. Put them in the skillet with the olive oil and season both sides with salt and pepper.


Brown them well on both sides.


The original recipe calls only for a 8 ounce can of crushed pineapple. But my husband decided he preferred chunks, and I like a lot of that sweet pineapple flavor - so I just dump the whole can in!

Reduce the heat at this point, and cover and simmer until the pork chops are tender. It will take about 20 minutes, and I usually flip them over about half-way through just to make sure they aren't getting to brown on the bottom.

You are supposed to add water at this point - but I had so much pineapple juice in there I didn't.


Bring the liquid to a boil and grab your box of Minute Rice. Pour it in until it looks like the rice will soak up all the liquid. (Originally it was 1 cup water, 1 1/2 cups Minute Rice and also 3/4 tsp salt, which I seem to have forgotten.)


Skootch it all around so the rice can touch the liquid, then cover it and remove it from the heat and let it stand for five minutes.


Dish it out for a tasty, hot, one-skillet meal.


Enjoy!